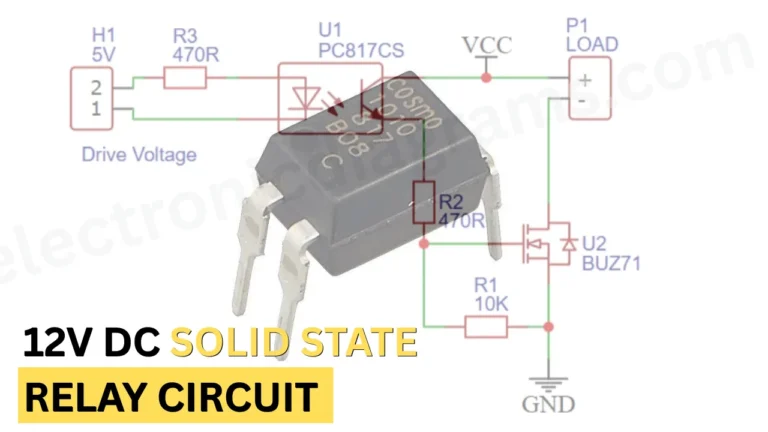
You cannot directly connect the small LED to the 220V AC ; it will explode. But we can light the LED safely using this simple circuit. However, you need to be cautious with the connections. This circuit is not recommended for beginners in electronics. Using a resistor , electrolytic capacitor and diode can achieve glowing a single LED from AC current.
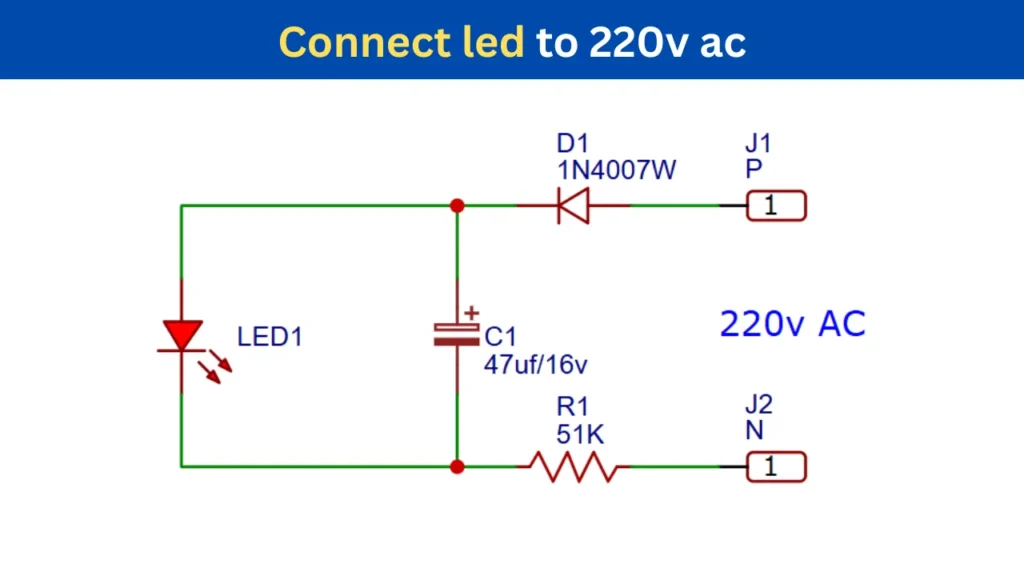
Circuit Diagram for Connecting an LED to 220V AC
Components Required
| Component | Value / Part Number | Quantity |
|---|---|---|
| LED1 | Standard LED (Red/White/Any Color) | 1 |
| D1 | 1N4007W Diode | 1 |
| R1 | 51KΩ Resistor | 1 |
| C1 | 47µF / 16V Electrolytic Capacitor | 1 |
| J1 | Phase (P) Input Terminal | 1 |
| J2 | Neutral (N) Input Terminal | 1 |
Purpose of Each Component in the Circuit
- LED glows when the required current is pass through it.
- The 1N4007 diode is used to rectify the AC voltage to half wave and protect the LED from reverse voltage.
- 51K resistor limits the current from 220V ac and protect the LED light.
- The 47 uf/16V capacitor smoothest the rectified voltage and gives smoot supply to the LED.
- The P and N is marked which are P is phase input and N is neutral input from the 220V AC.
Specifications of the 51K Resistor and 1N4007 Diode and LED
| Component | Specification |
|---|---|
| LED | Forward Voltage is 1.8V–3.3V which is depends on the LED color, Current is in between 10–20mA |
| 1N4007W Diode | Reverse Voltage is 1000V, Forward Current is 1A |
| 51KΩ Resistor | Resistance value of 51,000Ω, Recommended Power Rating is 1W to 2W |
| 47µF Capacitor | Voltage Rating is 16V, Electrolytic Type |
How the 220V AC LED Circuit Works
The 1N4007 diode is used to rectifies the input AC voltage and passes the half wave of the supply. The 47µF capacitor is connected across the diode and the 51k resistor, which will smooth the diode’s output voltage. The 51k resistor limits the current passing through it and only provides the current required for the operation of the LED. When the AC supply is connected, the limited voltage reaches the LED. The current passes through the LED , and it starts to glow.
The LED can be also glow using a single resistor, This way you can connect led to an ac without the diode and capacitor. You can prefer any one of the circuit. In myrecommendation you can use this diode based circuit.
Role of the 51K Resistor in the Circuit
- The main purpose of 51K resistor is Limit the current reaching to the LED. The required current is passing through it. This resistor may get hot because of the absorbing voltage and dissipated as heat. it is called voltage dropping. For 220V AC applications, a 1W or 2W resistor is generally recommended.
Testing the 220V AC LED Circuit Safely
- Confirm all connections are done properly.
- Use a good wire and insulate the connections before connecting into the AC supply.
- Switch off the Extensions box or Ac plug and connect the Phase pin first and neutral as follows.
- After connecting the wires do not touch any of the components or LED ligts.
- Turn ON the power switch and LED starts to Glow.